|
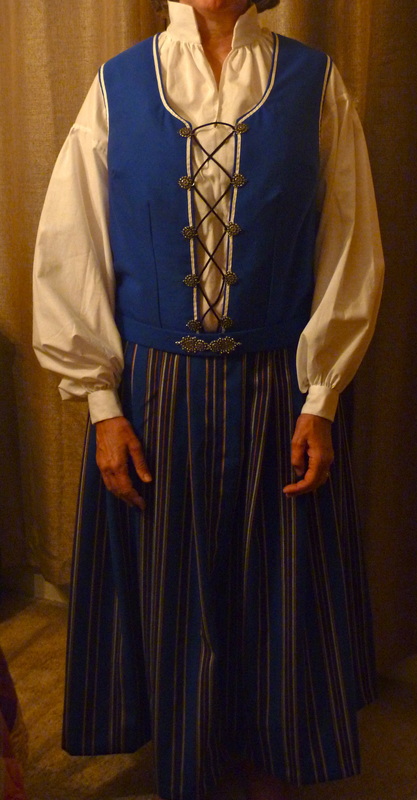
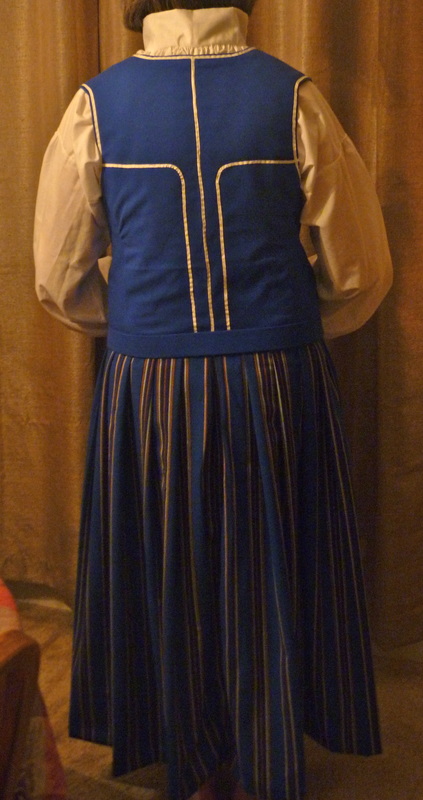
The bunad is completed, and I'm so excited to share final pictures of this project with you all! Without a proper model, the pictured proportions are a little off - but I thought it would be the best way to see the full effect: blouse, bodice, skirt, and belt. It's been so much fun to work on something with this much history behind it.
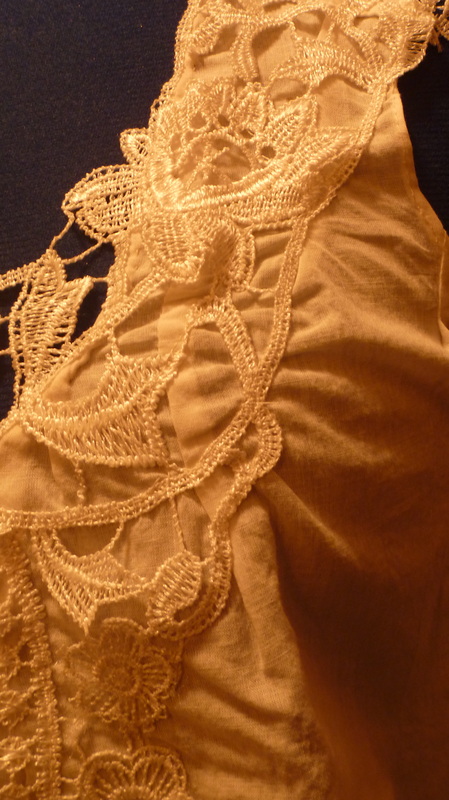
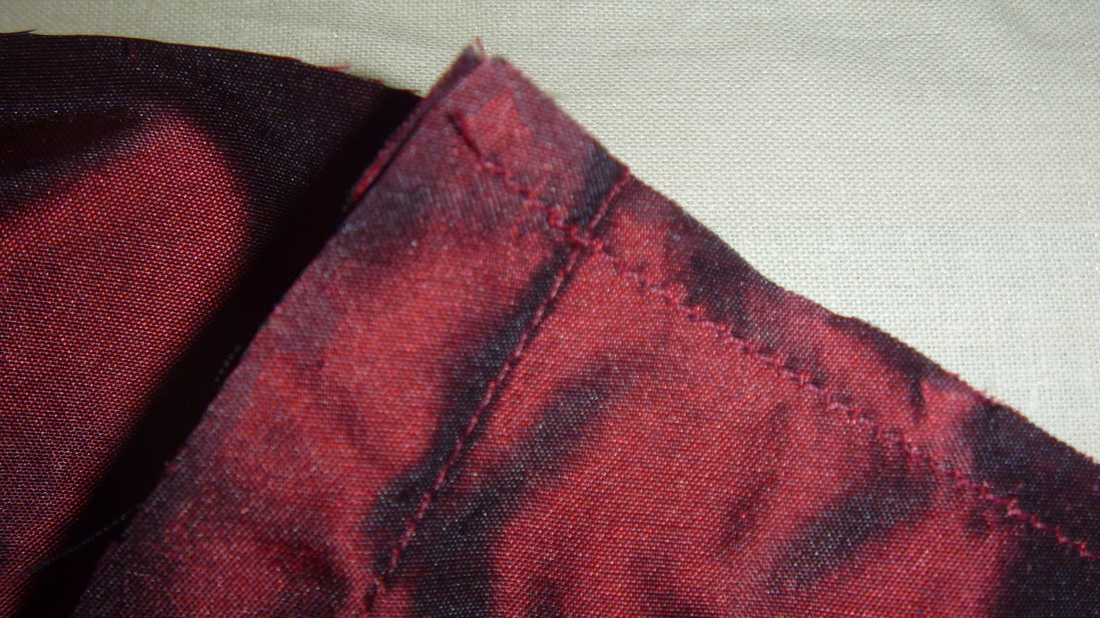
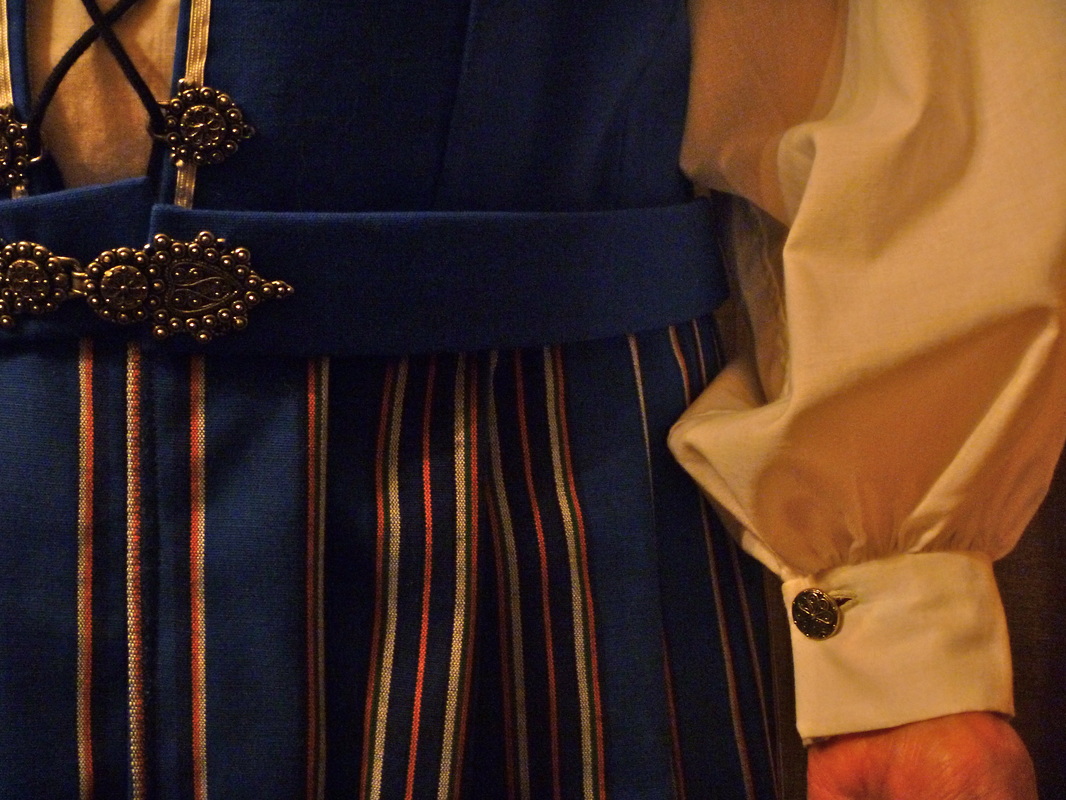 Skirt front, and sleeve, detail: The bodice and skirt are attached, with a continuous lap placket in the skirt, lined up with the bodice lacing. A separate matching belt finishes the ensemble. 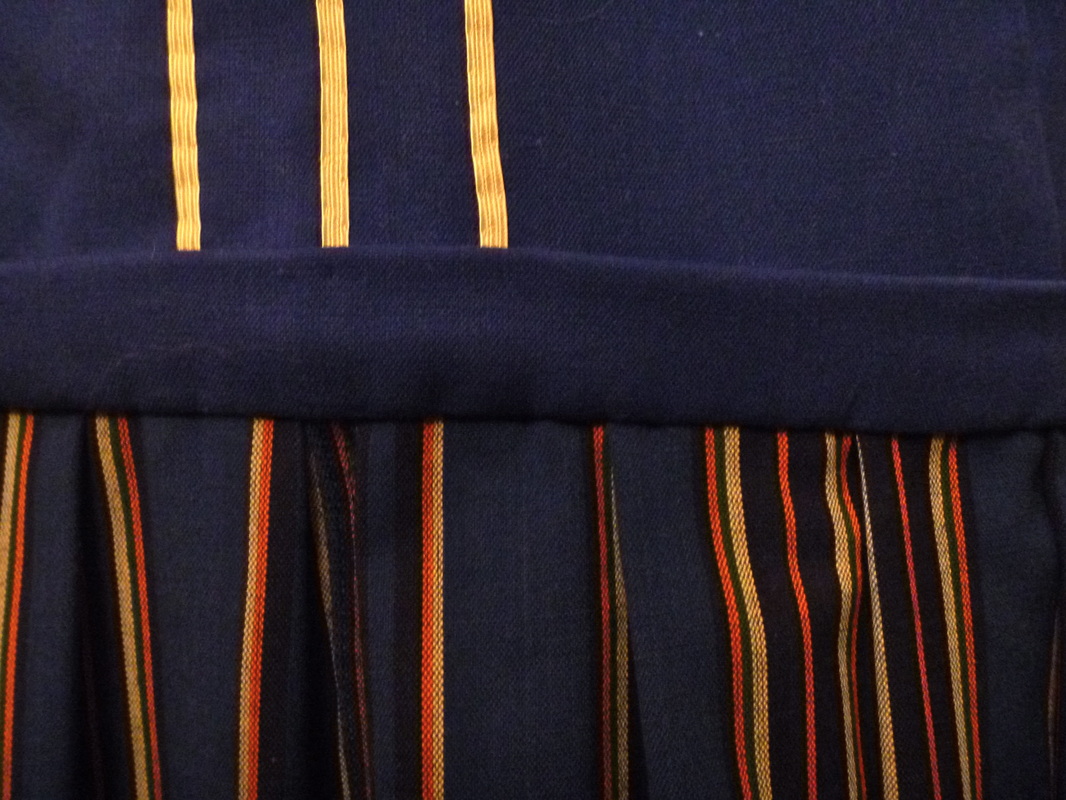 Skirt back detail: flat felled seams, the length is pleated towards the center back and sewn into a narrow waistband, which is attached to the bodice by hand.
0 Comments
I absolutely adored Lupita Nyong'o's gorgeous blue dress from the Oscars (like so many others). So when I came across a deep blue chiffon in - you guessed it - the S.R. Harris remnant bin, I decided to design a version of my own. 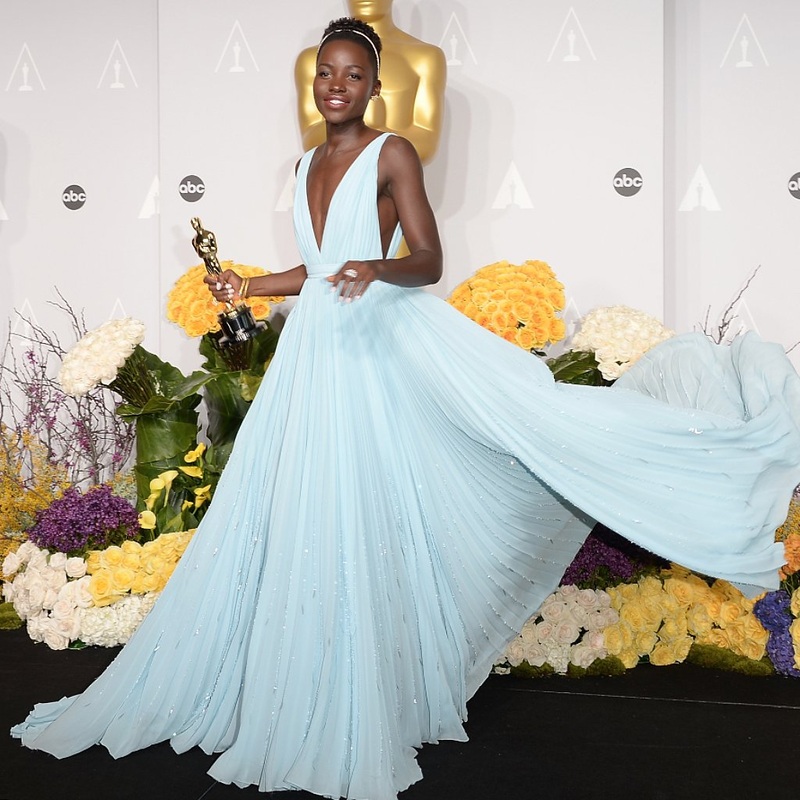
I take no credit for this photo.
Mine would be a darker blue, as that is more flattering with my complexion, a little bit more covering in the bodice, and just around knee length. Unfortunately, I don't have many occasions to wear floor length gowns. I'm also going to skip the beading that trails down the skirt, again, to make it a little more casual. 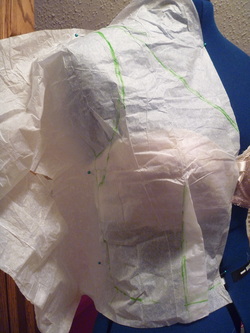 First step was to create a basic pattern for the bodice. I tried a technique I hadn't before, draping light tissue paper directly onto the dress form to draft the pattern. Here you can see the front piece. The lining will be fitted, and the chiffon overlay will be expanded along the waistline to create the gathering, with a little bit "blousier" of an effect than the original. Once everything was cut out, I took in the darts, sewed the front and back pieces together, and gathered the waistline of the chiffon. Finally, I attached the side and shoulders. Besides any finishing tucks and installing the zipper, the bodice is done! (Pictured here before the shoulders were finished.) As you can see, using a lighter shade of lining creates a shimmery finish.
Next steps are to french seam the skirt gores and finish the waistband. Part 2 coming soon!
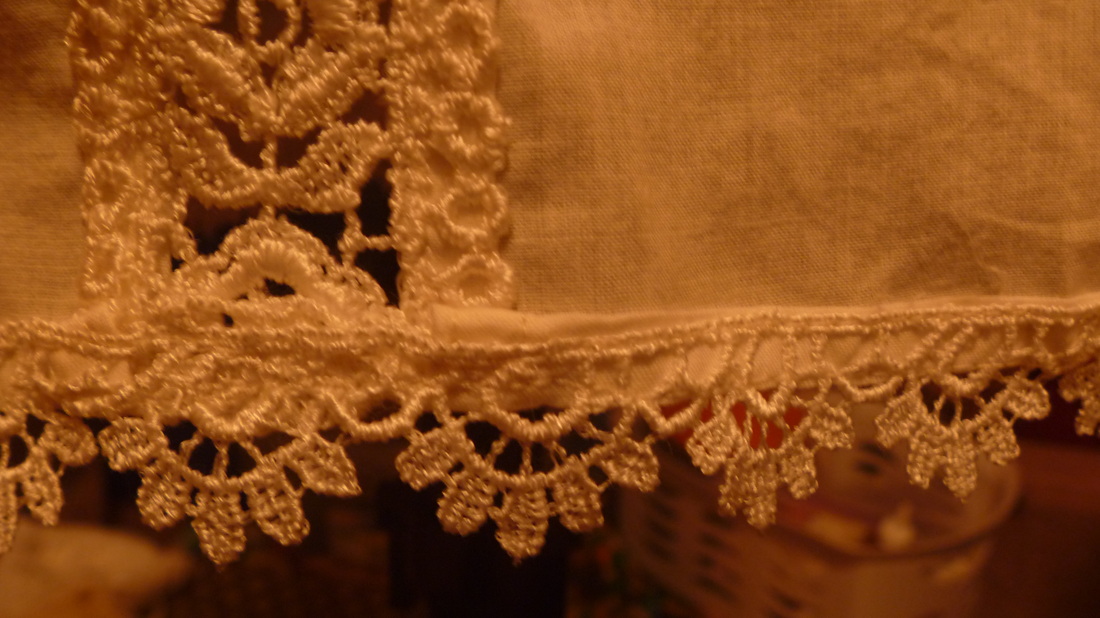
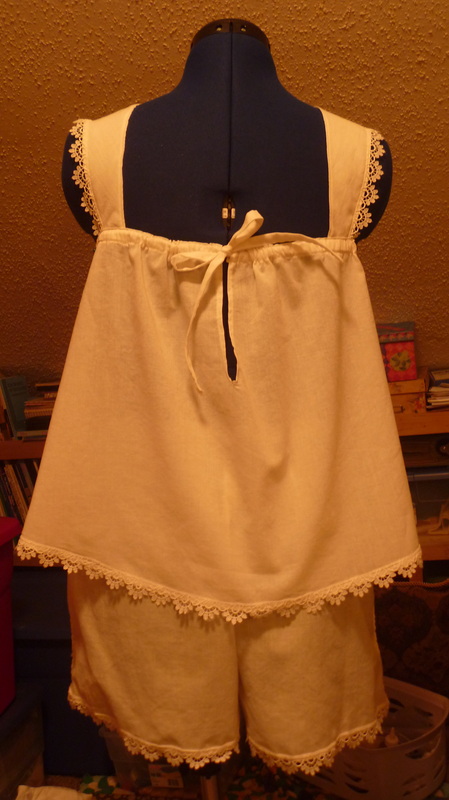
Karena Design is officially launching a new project line! For a long time, I've wanted to experiment with creating custom lingerie. It might have a bit of a trashy reputation in some circles, but I really believe that beautiful lingerie in the right context can be classy, flattering, and just really fun to wear. I find the best inspiration in vintage styles. My first piece, a little sleeper set, was originally inspired by a lovely vintage set, and specifically designed as wedding lingerie.  I've always loved light, lacy things. Sometimes I call them "running through the meadows" clothes, although this finished product probably wouldn't be worn outside. I started with a fine ivory cotton voile, and an assortment of laces. I designed this set from scratch, just using a pair of pajama shorts as a loose pattern for the bottoms. I finished most of the edges of this piece with lace, so while most interior seams were french seams, hems and insets were a little more complicated. 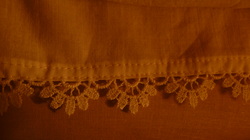 For intimate apparel, it's imperative that it's elegant and comfortable inside and out. For wider lace edges, I usually double turn the hem up on the right side, the opposite that I normally would. I then sew the lace over it, with one seam right above the turned up edge and on the top edge of the lace, and a second seam just at the bottom edge of the garment. For thinner lace, like the scalloped piece I used in several places on this garment, I double turn and stitch a hem as normal, then use a fine zig zag stitch to sew the lace right over the seam. And for a lace inset with a curved edge, like the bodice inset on this garment, I started by tacking and stitching down the lace piece on top of the bodice, then cutting away the unneeded fabric. For the neatest finish on the inside, I turned under these raw edges and stitched them by hand. Whew! 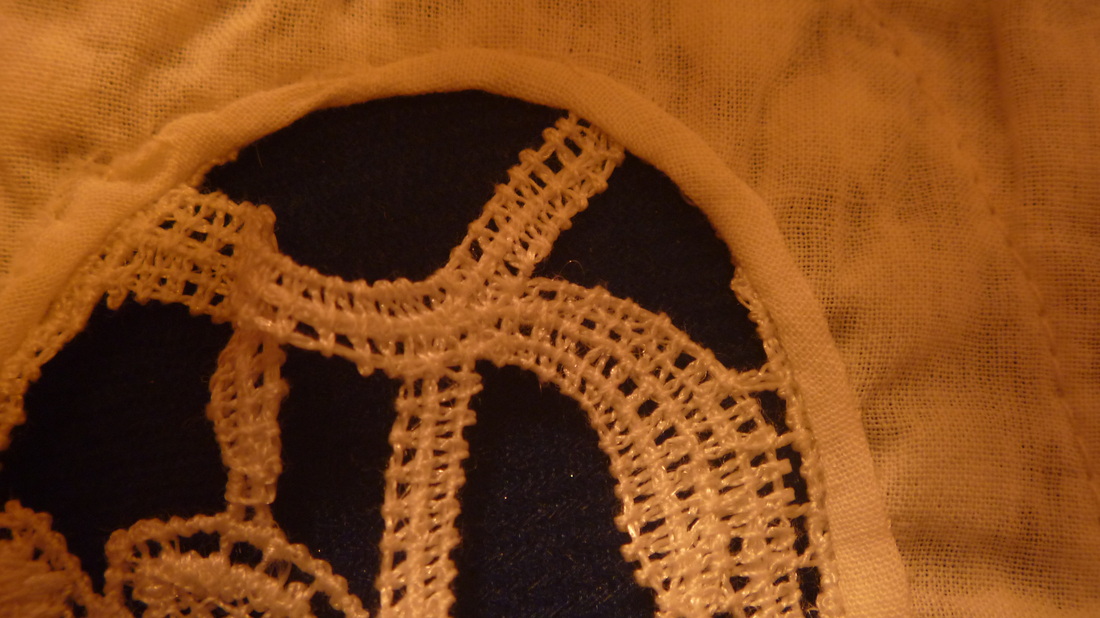 But even with all of the detail work, a lightweight cotton is easier to work with than say, a chiffon or other slippery or stretchy fabric. As I continue to design lingerie pieces, I'll be branching out into different materials, but for this piece, I enjoyed working with the simplicity of cotton. And I was very pleased with the finished product! The hardest part of lingerie is fitting precisely to a woman's curves - because even in a looser garment like this, the idea is to give as flattering of a fit as possible! Since I didn't use any elastic, I put a thin drawstring at the top of the shorts, and another in the back of the tank. I did the rest of the fitting with small darts along the neckline, that I then eased into the lace inset. And now here we are! 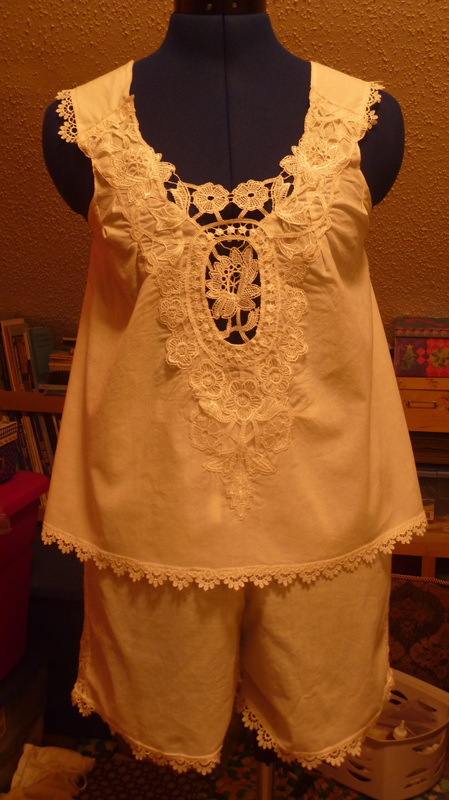
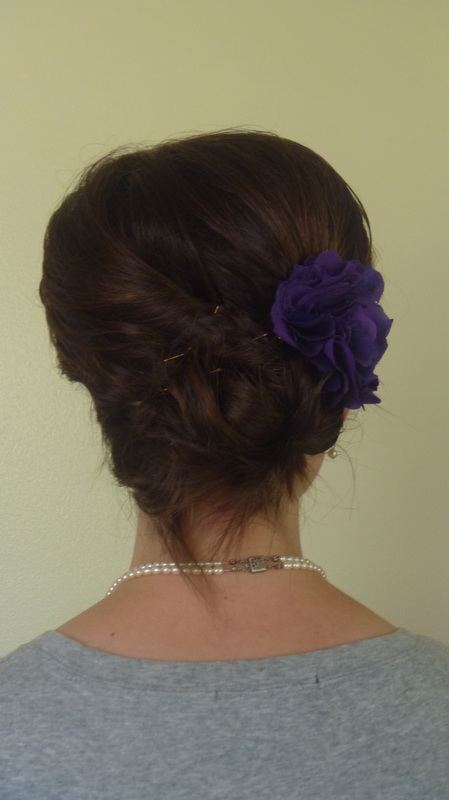
 Even though it may not look like it outside, it's officially spring! And that means that wedding season is right around the corner! Is anyone else as excited as I am? I thought I'd take a few minutes to look at one particular wedding I had the chance to work on a couple of summers ago. I love to be involved in people's special days and help in any way I can. For this wedding, I created the bridesmaid dresses as well as styling the bridesmaids' hair and the bride's makeup for the big day. 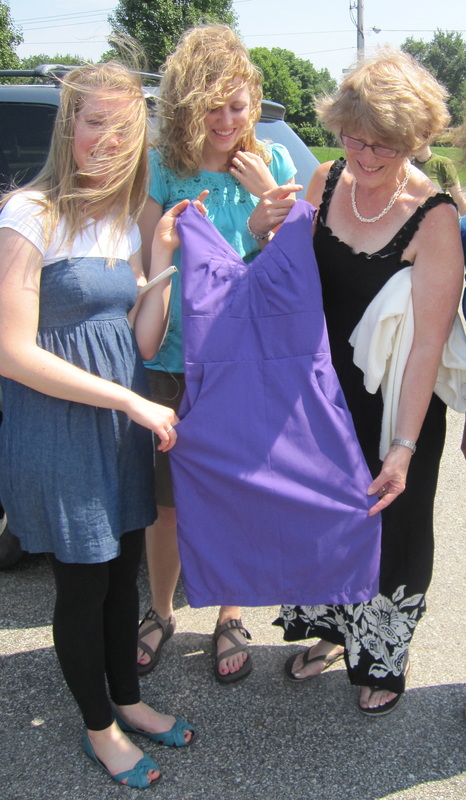 The bride was looking for a simple, elegant, sundress style in a royal purple, and couldn't find anything that worked just right and flattered her four bridesmaids. I came in, and I found a pattern that all of them could agree on, and that I could adjust to the different women. This was the first time the bride, her mother, and the maid of honor saw the first dress. Needless to say, they were all very excited. 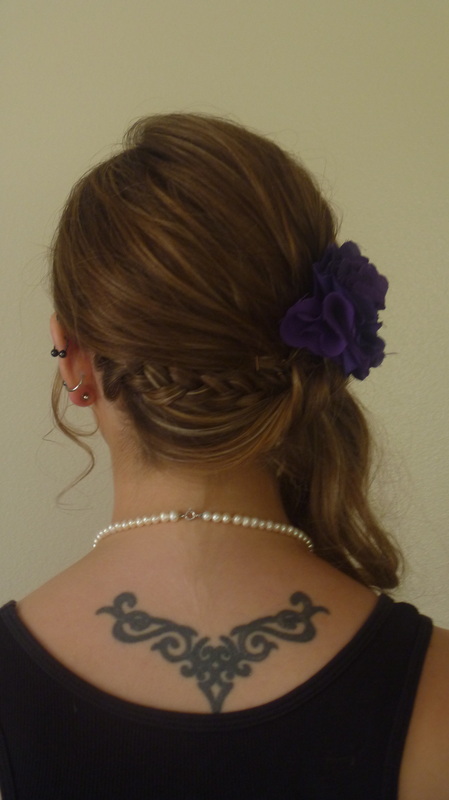 And did I mention that I also did the bridesmaid's hair? I've been styling hair for almost ten years for events and stage productions, everything from loose up-dos to formal vintage looks. If you're looking for a reasonable stylist for your next event, drop me a line at hkarenadesign. gmail.com. I worked with each of the ladies to find a style that worked with their personality and hair type, and still looked unified.
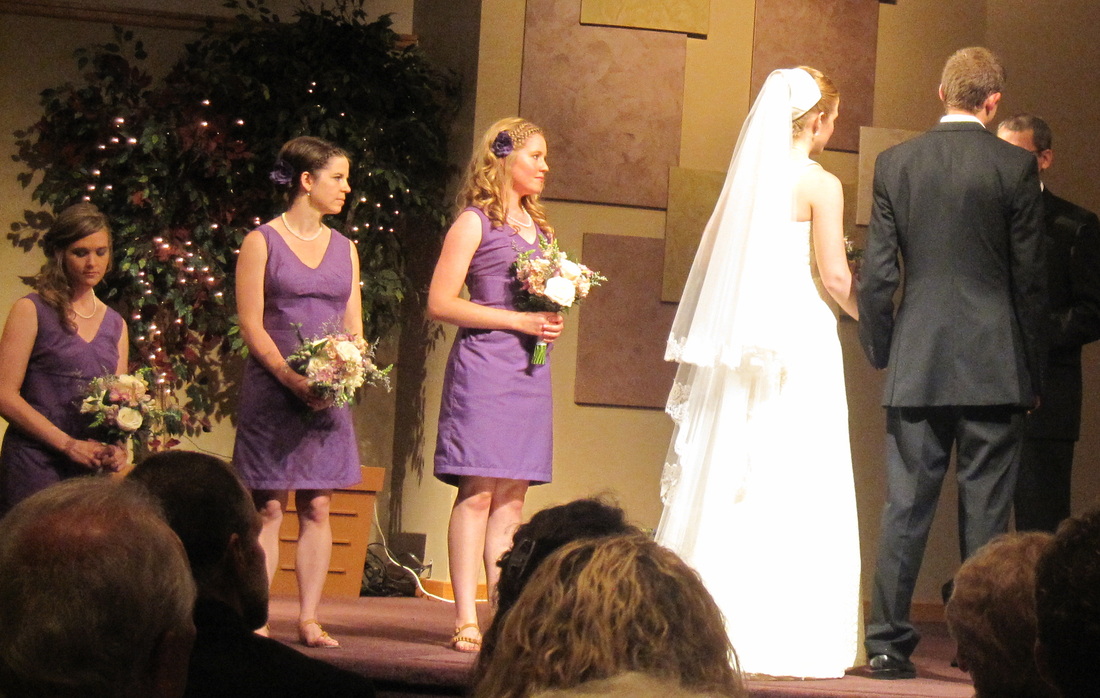 Don't they look lovely? If you or anyone you know is looking for the perfect bridesmaid dress, hairstylist, or needs alterations for their big day, email me at hkarenadesign.gmail.com. I'd love to help you out!
The dress is completed! All in all, the silk gave me very little trouble and the fittings went smoothly. My sister was trilled with the result, and of course, her recital was absolutely lovely. Another fun touch for the recital: I made a matching bow tie for the accompanist. In his words, they looked "pretty cute" in their matching attire. Custom fit bow ties are now available on my For Sale page! 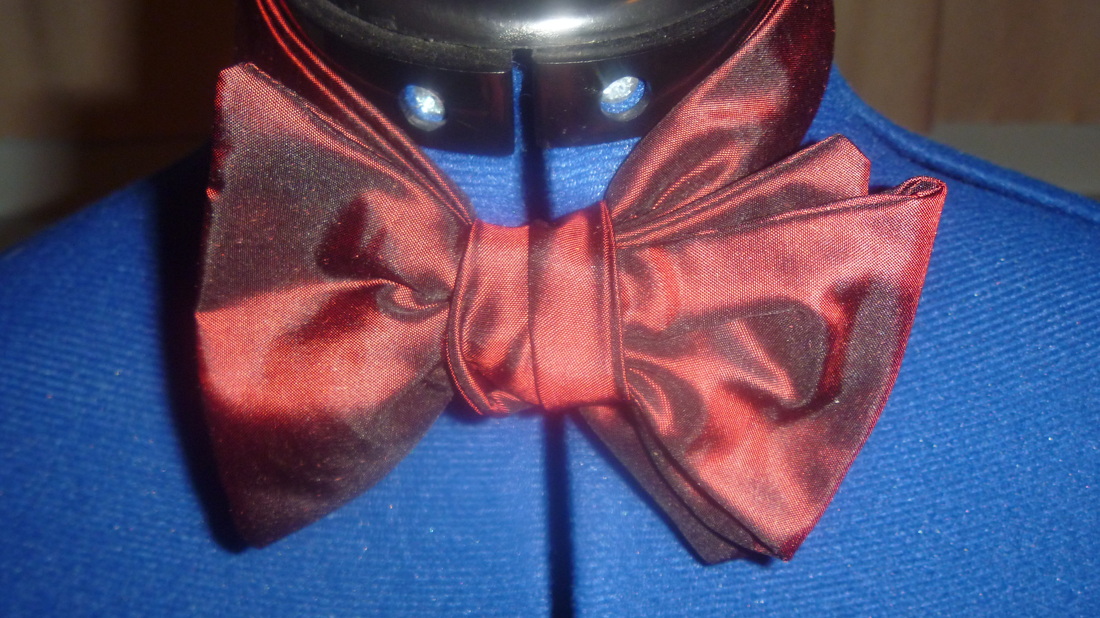
Looking for your own perfect formal or occasion gown? I'd love to work on it for you! I offer custom designs, made from patterns, and alterations. Send me an email at hkarenadesign.gmail.com with ideas or questions! 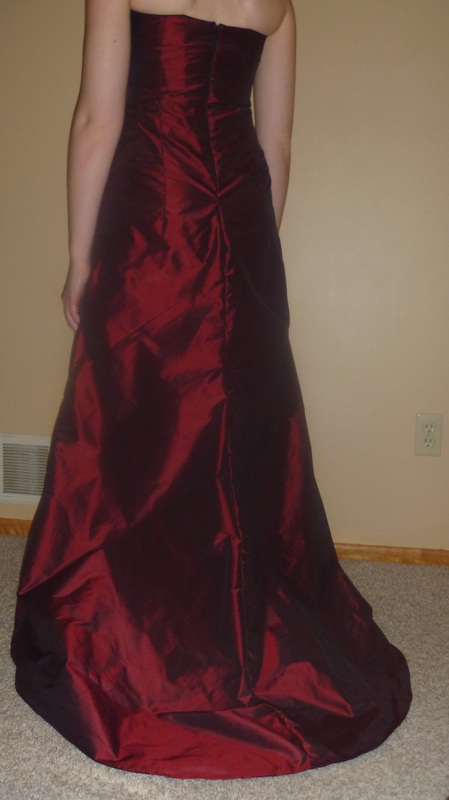
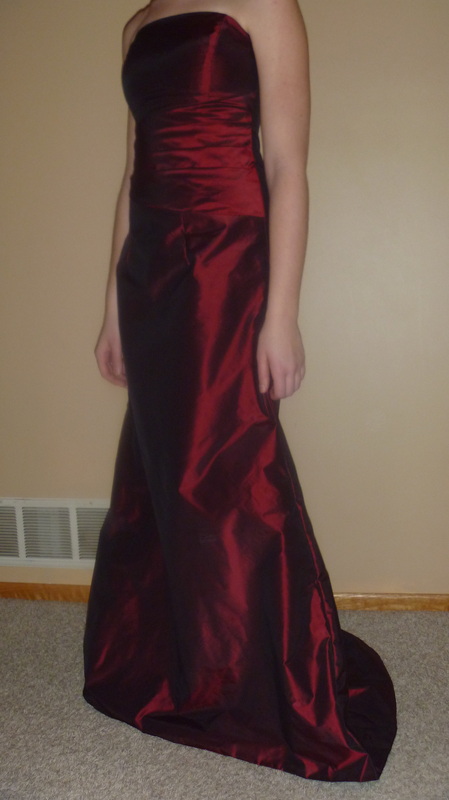
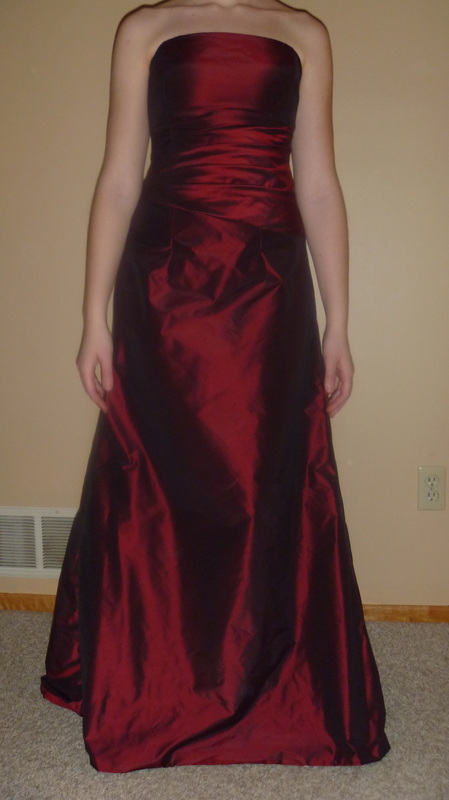
This Valentine's Day, my sister is giving her senior violin recital for her master's. She wanted a special dress to wear for the occasion that would fit her well and not be too expensive, so she asked me to make her one. With the theme of the day, she wanted something red and shimmery that would still be classy and elegant. At S.R. Harris, we found the perfect lightweight, deep red silk, and got a great deal on it. Here's the beginning steps of the process!
The first step was building the bodice lining and adding the boning. To create the pockets for the boning, I sewed the lining with an extra wide seam allowance, then pressed the seams to one side and stitched them down. Voila: double layer pockets on the seams.
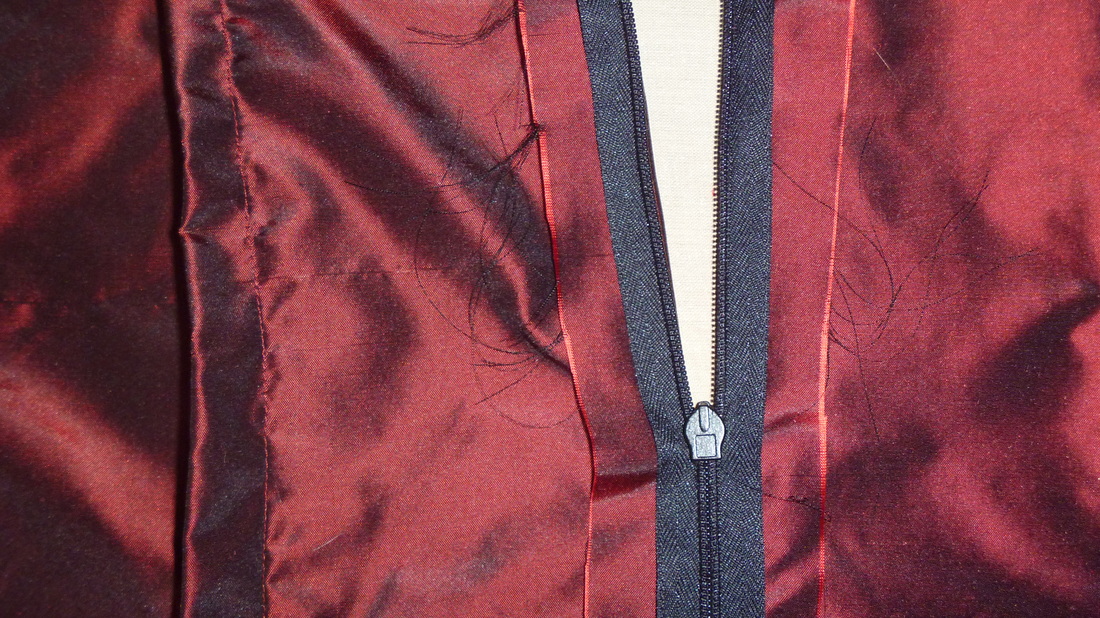
I've been working with lightweight, slippery, easily-frayed fabrics quite a bit in the last couple of months. To keep everything smooth and neat, as well as creating a garment that will wear well, I used a thin needle, small stitches, and finished all of the seams, even hidden ones. For this dress, I simply used fray-check on the shorter bodice seams hidden under the lining, and french seams for any that weren't covered by lining. And who knew it could be so easy to install an invisible zipper with the right presser foot on my machine? 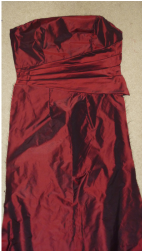 It's getting close to completion! One more fitting, and this gown will be finished!
Looking for your own one-of-a-kind occasion dress or bridesmaid dresses? Contact me with ideas or questions. And check back early next week for pictures of the finished gown! |
Design BlogThis is the place to find projects in process and get a glimpse inside of my work. Archives
December 2020
Categories
All
|


 RSS Feed
